Introduction
Fall is the season of pumpkin spice, warm desserts, and cozy treats. Among pumpkin-inspired goodies, no-bake pumpkin cheesecake balls are a standout choice. These bite-sized treats blend creamy cheesecake with the warm spices of pumpkin pie. The result is a dessert that’s simple, quick, and perfect for any occasion.
You can make these treats in no time. They are ideal for holiday gatherings, last-minute snacks, or satisfying your pumpkin cravings. Best of all, there’s no baking involved, so they’re great for beginners. The recipe is also customizable, making it perfect for creative dessert lovers.
This guide will cover the ingredients, steps, and tips to ensure success. From flavor ideas to serving suggestions, you’ll have everything you need to make these delightful pumpkin cheesecake balls.
Ingredients Required

Creating no-bake pumpkin cheesecake balls is simple and requires just a few basic ingredients. Most of these are pantry staples or items you can easily find at the store. Here’s a detailed breakdown of what you’ll need to get started:
Essential Ingredients
- Pumpkin Puree (1/2 cup):
First, use canned pumpkin puree for convenience. However, make sure it’s pure pumpkin and not pumpkin pie filling, as the latter contains added spices and sugar that may alter the recipe. - Cream Cheese (8 ounces):
Next, choose full-fat cream cheese for the richest and creamiest texture. Be sure to let it soften at room temperature so it blends smoothly with the other ingredients. - Powdered Sugar (1/2 cup):
This sweetener balances the tanginess of the cream cheese perfectly. If you prefer a sweeter dessert, you can adjust the amount to suit your taste. - Graham Crackers (1 cup, finely crushed):
Graham crackers provide a crunchy texture and classic cheesecake flavor. If you don’t have graham crackers, digestive biscuits make an excellent substitute. - Pumpkin Pie Spice (1 teaspoon):
To give the cheesecake balls their signature fall flavor, add pumpkin pie spice. Alternatively, you can use a mix of cinnamon, nutmeg, and ginger if you don’t have the spice blend on hand. - Vanilla Extract (1 teaspoon):
Finally, a splash of vanilla enhances the overall flavor profile, adding warmth and depth to the dessert.
Optional Add-Ins and Coatings
- White Chocolate (for dipping):
For an extra touch of sweetness, consider coating the cheesecake balls in melted white chocolate. This creates a smooth, sweet shell that pairs beautifully with the spiced filling. - Crushed Nuts or Sprinkles:
If you want added texture, roll the cheesecake balls in crushed pecans, walnuts, or festive sprinkles. These also give a decorative look to the treats. - Shredded Coconut:
Additionally, for a tropical twist, coat the cheesecake balls in unsweetened or lightly sweetened shredded coconut. - Chocolate Chips or Cinnamon Sugar:
Finally, for variation, you can mix mini chocolate chips into the dough or roll the balls in cinnamon sugar. These options add another layer of flavor and texture.
Tools You’ll Need
To prepare this recipe efficiently, gather the following tools:
- A mixing bowl and a spatula to combine the ingredients thoroughly.
- A cookie scoop or spoon to shape the balls evenly.
- A baking sheet lined with parchment paper to chill the cheesecake balls before serving.
By assembling these ingredients and tools, you’ll be well on your way to creating these delightful treats. Next, we’ll guide you through the step-by-step recipe to ensure your cheesecake balls turn out perfectly.
For a complete autumn dessert table, pair these pumpkin cheesecake balls with Pumpkin Pie Cookies: A Fall Treat You’ll Crave All Year. Both recipes celebrate the comforting flavors of pumpkin spice.
Step-by-Step Recipe
Making no-bake pumpkin cheesecake balls is straightforward and doesn’t require advanced skills. By following these steps, you’ll have delicious, bite-sized treats ready in no time. Let’s dive in!
Preparing the Mixture
- Soften the Cream Cheese:
Begin by allowing the cream cheese to soften at room temperature. This step is crucial for achieving a smooth and creamy consistency. If you’re short on time, you can microwave it for 10 seconds, but avoid overheating. - Combine the Base Ingredients:
In a large mixing bowl, blend the softened cream cheese, pumpkin puree, powdered sugar, and vanilla extract. Use a hand mixer or whisk to ensure the ingredients are thoroughly incorporated. The mixture should be smooth and free of lumps. - Add Spices for Flavor:
Sprinkle in the pumpkin pie spice (or your custom blend of cinnamon, nutmeg, and ginger). Stir well to distribute the spices evenly throughout the mixture. This step gives the cheesecake balls their warm, signature flavor. - Incorporate the Graham Crackers:
Gradually fold in the crushed graham crackers. Mix until the texture resembles a soft dough. If the mixture feels too sticky, add more crushed graham crackers, one tablespoon at a time, until it’s manageable.
If you’re hosting a fall gathering, consider adding How to Make Delicious No Yeast Rolls: A Step-by-Step Guide to your menu for a savory complement to these sweet treats.
Shaping the Balls

- Chill the Mixture:
Place the bowl in the refrigerator for 30 minutes. Chilling helps the mixture firm up, making it easier to roll into balls. - Portion the Dough:
Use a cookie scoop or spoon to portion the chilled mixture into even-sized balls, approximately 1 inch in diameter. This ensures consistency in size, which is important for both appearance and serving. - Shape by Hand:
Roll each portion between your palms to create a smooth, round ball. Place the shaped balls on a parchment-lined baking sheet.
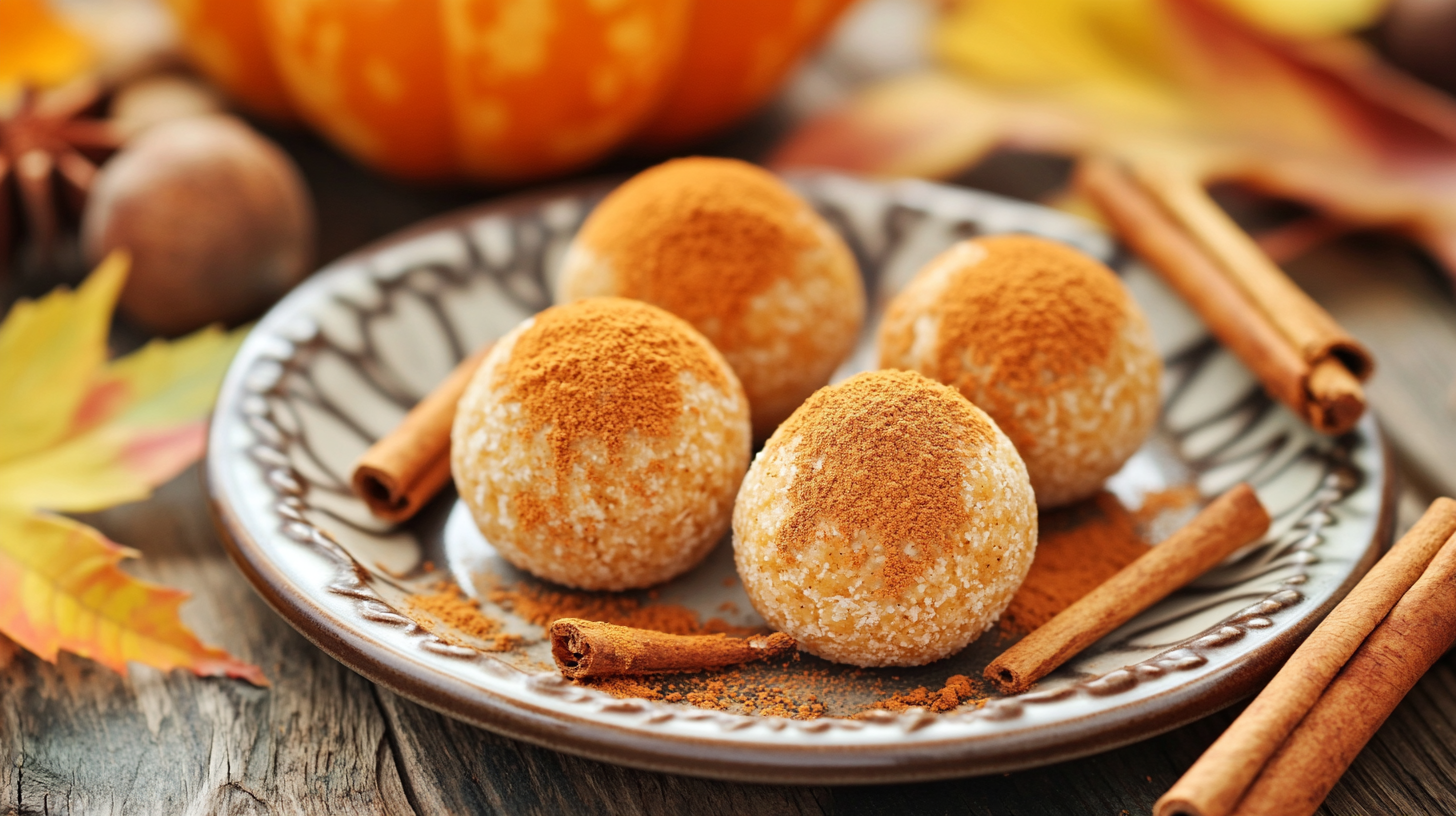
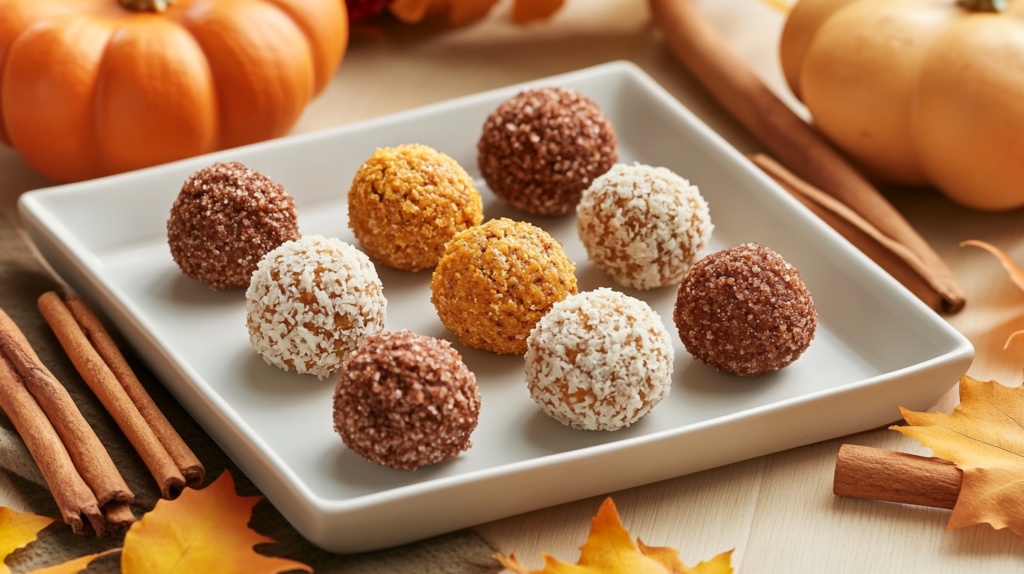
Coating Options
- Prepare Your Coating:
While the balls chill, prepare your desired coatings. For white chocolate, melt it in a microwave-safe bowl, stirring every 15 seconds to avoid burning. Set up crushed nuts, graham cracker crumbs, or shredded coconut in separate shallow dishes. - Dip or Roll the Balls:
- For a chocolate coating, dip each ball into the melted chocolate, using a fork to lift it out and let excess chocolate drip off.
- Alternatively, roll the balls in your chosen coating, such as graham cracker crumbs, crushed nuts, or shredded coconut.
- Set the Coating:
Return the coated balls to the parchment-lined baking sheet. For chocolate-coated balls, let them set in the refrigerator for about 20 minutes until the coating hardens.
Final Touches
Serve and Enjoy:
Once the coating is set, your pumpkin cheesecake balls are ready to serve. Arrange them on a festive platter or store them in an airtight container until you’re ready to enjoy.
Decorate (Optional):
If desired, drizzle melted dark or white chocolate over the coated balls for an elegant touch. You can also sprinkle a pinch of cinnamon or nutmeg on top for extra flavor.
Tips for Success
To ensure your no-bake pumpkin cheesecake balls turn out perfectly, here are some practical tips and tricks. These will help you refine the texture, enhance the flavor, and avoid common pitfalls.
Perfecting the Texture
- Achieving the Right Consistency:
The mixture should be firm enough to roll but still creamy. If it’s too sticky, gradually add more crushed graham crackers until it holds together without being overly crumbly. - Avoid Overmixing:
When blending the ingredients, stop mixing as soon as they are combined. Overmixing can make the mixture too soft, which will affect the rolling process. - Chill for Firmness:
Don’t skip the chilling step! Allowing the mixture to rest in the fridge makes it easier to shape the balls without them sticking to your hands.
Storage and Serving Ideas
- Refrigeration:
Store the finished cheesecake balls in an airtight container in the refrigerator. They’ll stay fresh for up to 5 days. For best results, place parchment paper between layers to prevent them from sticking together. - Freezing for Later:
If you want to make them ahead of time, freeze the balls in a single layer on a baking sheet. Once frozen, transfer them to a freezer-safe container. When you’re ready to enjoy, let them thaw in the fridge for a few hours before serving. - Serving Suggestions:
- Arrange the cheesecake balls on a decorative platter and garnish with a sprinkle of cinnamon or nutmeg for a festive look.
- Pair them with a cup of hot coffee, tea, or apple cider for a cozy treat.
- Serve them as part of a dessert buffet alongside other bite-sized treats like truffles or cookies.
Customizing Your Recipe
- Experiment with Flavors:
- Add a tablespoon of maple syrup or caramel sauce to the mixture for extra sweetness.
- Mix in chocolate chips, dried cranberries, or toffee bits for a unique twist.
- Swap the pumpkin puree for mashed sweet potato or butternut squash for a different flavor profile.
- Explore Coating Options:
While graham cracker crumbs are traditional, try crushed Oreos, gingersnap cookies, or even colorful sprinkles for a fun variation. - Adjusting Sweetness:
Taste the mixture before shaping the balls and adjust the sugar level to your liking. You can reduce the powdered sugar or substitute it with alternatives like honey or stevia.
Common Mistakes to Avoid
Uneven Coating:
Ensure your coatings are evenly spread out in shallow dishes. This makes rolling or dipping easier and results in a uniform appearance.
Using the Wrong Pumpkin:
Always use plain pumpkin puree, not pumpkin pie filling. The added spices and sugar in pie filling can throw off the balance of the recipe.
Skipping the Chill Time:
Rushing through the chilling process can make the mixture too soft and sticky to handle. Patience pays off for the perfect texture.
Why You’ll Love This Recipe
The appeal of no-bake pumpkin cheesecake balls goes beyond their delicious taste. These treats are quick to prepare, endlessly customizable, and perfect for any occasion. Let’s explore why this recipe is sure to become a favorite in your kitchen.
Versatility of Flavors
- Customizable Ingredients:
One of the best things about this recipe is how easy it is to customize. You can experiment with different spices, coatings, or mix-ins to suit your taste. For example, adding crushed ginger snaps or a pinch of allspice can give the balls a festive holiday flair. - Adapts to Preferences:
Whether you like your treats extra sweet or prefer a more subtle flavor, you can adjust the sugar and spice levels. Additionally, try different toppings like shredded coconut, crushed cookies, or even a drizzle of caramel. - Seasonal and Beyond:
While pumpkin is synonymous with fall, these cheesecake balls can be made year-round. Substitute the pumpkin puree with other purees, like sweet potato or butternut squash, for a fresh take on the classic.
For a savory start to your day, contrast these sweet treats with Avocado Toast with Cottage Cheese: A Nutritious Twist to Your Breakfast.
Quick and Easy Dessert Option
- No Baking Required:
Since this recipe is no-bake, it’s perfect for those who don’t have access to an oven or prefer not to use one. This also means you can prepare it on hot days without heating up your kitchen. - Ready in No Time:
From start to finish, you can whip up these treats in under an hour. With minimal prep and just a short chilling period, they’re an excellent option for last-minute desserts. - Beginner-Friendly:
Even if you’re not a seasoned baker, this recipe is foolproof. The steps are straightforward, and there’s plenty of room for creativity without worrying about exact measurements or baking times.
Perfect for Any Occasion
- Festive Gatherings:
These cheesecake balls are a hit at holiday parties, potlucks, and family dinners. Their bite-sized nature makes them easy to serve and enjoy. - Snack or Dessert:
Whether you’re looking for a quick snack to satisfy your sweet tooth or a sophisticated dessert for entertaining, these treats fit the bill. Pair them with a cup of coffee or hot cider for an extra cozy experience. - Kid-Friendly Fun:
Making these cheesecake balls can be a fun activity to do with kids. Let them help with rolling the balls or dipping them in their favorite toppings.
Minimal Cleanup
Store and Serve with Ease:
Once the balls are made, they can be stored in the fridge or freezer until you’re ready to serve. No complicated reheating or plating is required.
Fewer Dishes:
Unlike traditional baked desserts, this recipe only requires a mixing bowl, a spoon, and a baking sheet. Cleanup is quick and hassle-free.
No Specialized Equipment:
You don’t need a stand mixer, piping bags, or other baking tools. A simple whisk or spatula will do the job perfectly.
Nutritional Information
Understanding the nutritional content of your no-bake pumpkin cheesecake balls is important, especially if you’re mindful of your diet or catering to specific preferences. Below, we’ll break down the calorie content, suggest healthier alternatives, and provide tips for making these treats as indulgent—or as light—as you want.
Calorie Breakdown
The exact nutritional value of the cheesecake balls will depend on the ingredients and portion sizes, but here’s a general estimate for a batch that makes 12 balls:
- Calories per ball: Approximately 110–140 kcal
- Protein: 1–2 grams
- Fat: 6–8 grams
- Carbohydrates: 13–15 grams
- Sugar: 8–10 grams
These values are based on a recipe that uses full-fat cream cheese, pumpkin puree, powdered sugar, and graham cracker crumbs. Adding coatings like white chocolate or nuts will increase the calorie and fat content.
Healthier Alternatives
- Swap Full-Fat Cream Cheese:
Use reduced-fat cream cheese or a dairy-free alternative to cut down on calories and saturated fat. Keep in mind, however, that the texture may be slightly less creamy. - Opt for Low-Sugar Substitutes:
Replace powdered sugar with natural sweeteners like honey, maple syrup, or stevia. This can lower the sugar content while still providing sweetness. - Choose Whole-Grain Options:
Substitute graham crackers with crushed whole-grain or gluten-free biscuits for added fiber. - Experiment with Yogurt:
Blend Greek yogurt into the mixture for a protein boost and a tangy flavor. Use it to replace a portion of the cream cheese for a lighter version.
Balancing Indulgence and Nutrition
- Portion Control:
Stick to small, bite-sized portions to satisfy your sweet tooth without overindulging. Using a cookie scoop helps ensure uniform and appropriately sized balls. - Add Nutrient-Dense Ingredients:
Enhance the recipe with mix-ins like chia seeds, flaxseeds, or finely chopped dried fruit for added nutrients. These additions can increase the fiber and vitamin content. - Skip the Coating:
For a lighter option, omit the white chocolate or sugar-heavy coatings and simply roll the balls in finely crushed graham crackers or unsweetened coconut.
Dietary Adjustments
Keto-Friendly Version:
Substitute the graham crackers with crushed nuts or almond flour and use a low-carb sweetener like erythritol.
Making it Gluten-Free:
Use gluten-free graham crackers or crushed rice cereal to keep this recipe suitable for those with gluten sensitivities.
Dairy-Free Option:
Replace cream cheese with a plant-based cream cheese alternative. Combine it with coconut cream for added richness.
Frequently Asked Questions (FAQs)
Here are answers to some of the most commonly asked questions about making no-bake pumpkin cheesecake balls. These tips will help you troubleshoot issues and customize the recipe to fit your needs.
Can I use fresh pumpkin instead of canned?
Yes, you can use fresh pumpkin instead of canned puree, but it requires a few extra steps. Start by roasting a small pumpkin, then scoop out the flesh and puree it in a blender or food processor until smooth. Make sure to drain any excess liquid, as fresh pumpkin tends to be more watery than canned. This step is essential to maintain the right consistency for the cheesecake balls.
How long can I store these treats?
Pumpkin cheesecake balls can be stored in the refrigerator for up to 5 days. Keep them in an airtight container to maintain freshness. For longer storage, you can freeze them for up to 2 months. To serve, thaw the frozen balls in the refrigerator for several hours until they soften slightly.
What can I use as a coating?
There are many coating options to suit different tastes:
- Traditional: Graham cracker crumbs or crushed digestive biscuits.
- Nutty: Crushed pecans, almonds, or hazelnuts.
- Sweet: Melted white chocolate or dark chocolate.
- Festive: Sprinkles, cinnamon sugar, or even powdered sugar.
Feel free to mix and match coatings to create a variety of flavors and textures.
Are these gluten-free?
The standard recipe uses graham crackers, which typically contain gluten. However, you can easily make a gluten-free version by substituting regular graham crackers with certified gluten-free alternatives. Other options include crushed gluten-free cookies, almond flour, or crushed rice cereal.
Can I freeze the cheesecake balls?
Yes, these treats freeze very well! Arrange the balls in a single layer on a baking sheet and freeze until firm. Once frozen, transfer them to a freezer-safe container or bag. To serve, thaw them in the refrigerator for a few hours. Avoid thawing them at room temperature, as they may become too soft.
Can I make these vegan?
Absolutely! Replace the cream cheese with a dairy-free or vegan cream cheese alternative. Use plant-based butter in place of traditional butter (if your coating recipe calls for it) and ensure any chocolate used is vegan. For a rich flavor, you might add a touch of coconut cream to the mixture.
Conclusion
No-bake pumpkin cheesecake balls are a delightful dessert that combines the warm, comforting flavors of fall with the creamy richness of cheesecake. They’re perfect for any occasion, whether you’re hosting a party, celebrating the holidays, or simply looking for a quick and satisfying treat.
This recipe’s simplicity and versatility make it a must-try for both seasoned bakers and beginners. The no-bake aspect saves time, while the customizable flavors and coatings ensure there’s something for everyone. Plus, with easy adjustments for dietary needs, these cheesecake balls can cater to a variety of preferences.
With just a few basic ingredients, a little creativity, and minimal effort, you’ll have a batch of delicious pumpkin cheesecake balls that are sure to impress. So why wait? Gather your ingredients, follow the step-by-step guide, and enjoy these bite-sized treats today.