Introduction
Chicken nuggets have become a staple in households across the globe, beloved by both children and adults alike. Whether served as a quick lunch, party snack, or paired with your favorite dipping sauce, their appeal is undeniable. But have you ever considered making them from scratch?
Homemade chicken nuggets crafted with ground chicken bring a whole new level of freshness and flavor to this classic dish. Not only are they free from preservatives and additives commonly found in store-bought options, but they’re also entirely customizable. You can control the ingredients, spices, and even the cooking method to suit your family’s taste and dietary needs.
Using ground chicken instead of whole chicken breasts has its advantages too. It’s easy to work with, affordable, and allows for even seasoning distribution throughout the mixture. Plus, shaping nuggets from ground chicken is incredibly fun, especially if you’re cooking with kids.
This article will walk you through the process of making these nuggets from scratch, with step-by-step instructions, tips for achieving the perfect texture, and ideas for serving. Let’s dive into the world of crispy, juicy, homemade chicken nuggets!
Ingredients Needed

Crafting homemade chicken nuggets with ground chicken starts with gathering the right ingredients. The beauty of homemade nuggets lies in their simplicity and versatility, allowing you to control every aspect of their flavor and texture.
Key Ingredients for Ground Chicken Nuggets
Here’s what you’ll need for the basic recipe:
- Ground Chicken (1 lb): The star ingredient. Opt for lean ground chicken for a healthier option or one with a bit of fat for added juiciness.
- Eggs (2): Acts as a binder to hold the nuggets together.
- Breadcrumbs (1 cup): Provides structure to the chicken mixture. Use plain or seasoned breadcrumbs, depending on your taste.
- Parmesan Cheese (Optional, ¼ cup): Adds a savory, cheesy note.
- Seasonings (Salt, Pepper, Garlic Powder, Paprika, Onion Powder): These enhance the flavor of the nuggets. Adjust the quantities to your preference.
- Flour (½ cup): For dredging the nuggets before coating, helping the breadcrumbs stick better.
- Oil (for Frying): Choose a neutral oil like vegetable, canola, or avocado oil if frying.
How to Select the Best Ground Chicken
Not all ground chicken is created equal. Here’s what to look for:
- Freshness: Ensure the ground chicken has a mild, fresh smell and is pale pink. Avoid any packages with grayish spots or an off odor.
- Fat Content: Decide based on preference. Ground chicken breast is leaner, while a mix of white and dark meat provides more flavor.
- Organic or Free-Range Options: For those prioritizing quality, consider organic or free-range chicken to avoid added hormones or antibiotics.
Recommended Seasonings for Flavor
Seasonings can transform simple ground chicken into restaurant-quality nuggets. Beyond the basics of salt, pepper, and garlic powder, experiment with:
- Herbs: Add dried oregano, parsley, or thyme for a Mediterranean twist.
- Spices: Cayenne or smoked paprika for a smoky heat.
- Asian-Inspired Flavors: Soy sauce, ginger, and a touch of sesame oil blended into the mix create an exciting variation.
Using fresh herbs or grated garlic instead of powders can also elevate the dish.
Preparing the Chicken
Once you’ve gathered your ingredients, it’s time to transform ground chicken into flavorful, perfectly shaped nuggets. Preparation is key to achieving a juicy texture and ensuring the nuggets hold together during cooking.
Blending the Ground Chicken with Seasonings
- Combine Ingredients in a Bowl:
- Place the ground chicken in a large mixing bowl.
- Add your chosen seasonings: salt, pepper, garlic powder, onion powder, and paprika. Start with 1 teaspoon of each and adjust as needed.
- Incorporate the breadcrumbs and Parmesan cheese (if using) for structure and flavor.
- Add Eggs as a Binder:
- Crack two eggs into the mixture. Eggs act as a binding agent, ensuring the nuggets don’t fall apart during cooking.
- Mix Thoroughly:
- Use clean hands or a wooden spoon to combine the ingredients. Mixing by hand ensures the flavors distribute evenly.
- Test for Flavor (Optional):
- Fry a small portion of the mixture to taste and adjust seasonings if necessary.
Tips for Shaping Uniform Nuggets
Getting consistent nugget shapes doesn’t just make them look good; it ensures even cooking.
Place the shaped nuggets on a tray and refrigerate for 15-20 minutes. Chilling helps them firm up, making them easier to coat.
Use a Spoon or Scoop:
A tablespoon or small cookie scoop is perfect for portioning out equal amounts of the chicken mixture.
Shape by Hand:
Lightly wet your hands with water or oil to prevent the chicken from sticking. Roll each portion into a ball and flatten slightly for a classic nugget shape.
Keep It Consistent:
Aim for nuggets about 1.5 inches wide and ½ inch thick. This size is ideal for cooking evenly, whether frying, baking, or air frying.
Chill Before Coating:
Place the shaped nuggets on a tray and refrigerate for 15-20 minutes. Chilling helps them firm up, making them easier to coat.
For a similar preparation technique, check out our creamy Alfredo lasagna soup recipe to see how ingredients are blended to achieve rich textures.
Coating Options
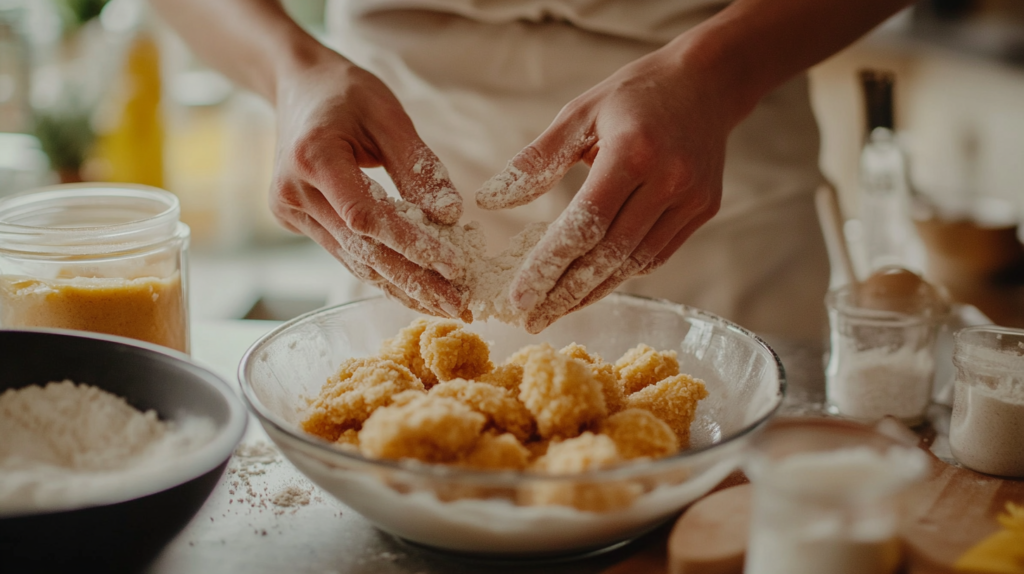
The coating is what gives chicken nuggets their irresistible crunch and golden-brown exterior. Whether you prefer the traditional breadcrumb coating or want to explore healthier and creative alternatives, there are plenty of options to suit your taste.
Traditional Breadcrumb Coating
- Set Up a Coating Station:
- Use three shallow bowls or plates:
- Bowl 1: All-purpose flour seasoned with a pinch of salt and pepper.
- Bowl 2: Beaten eggs for binding the coating.
- Bowl 3: Breadcrumbs, plain or seasoned, for the outer crust.
- Use three shallow bowls or plates:
- Coating Steps:
- Step 1: Dredge each nugget in the seasoned flour, shaking off any excess.
- Step 2: Dip the floured nugget into the egg mixture, ensuring it’s fully coated.
- Step 3: Roll the nugget in the breadcrumbs, pressing lightly to ensure the coating adheres evenly.
- Tip for Extra Crunch:
- For an even crispier texture, use panko breadcrumbs or mix in crushed cornflakes with the breadcrumbs.
Alternative Coatings
Looking for something different? These options add variety to your homemade nuggets:
- Panko Coating:
- Japanese-style breadcrumbs are larger and create a light, airy crunch.
- Crushed Cereal Coating:
- Cornflakes or rice cereal add sweetness and an ultra-crispy finish. This option is a hit with kids.
- Almond Flour or Coconut Flour:
- Ideal for gluten-free or low-carb diets. Almond flour provides a nutty flavor, while coconut flour adds subtle sweetness.
- Cheese and Breadcrumb Mix:
- Mixing grated Parmesan or cheddar with breadcrumbs adds a rich, cheesy crust.
Learn about making a crispy coating in our grilled chicken fettuccine Alfredo recipe, where breadcrumbs enhance the dish.
Making Gluten-Free Chicken Nuggets
- Gluten-Free Flour:
- Replace regular flour with gluten-free all-purpose flour or cornstarch for dredging.
- Gluten-Free Breadcrumbs:
- Use gluten-free breadcrumbs or crushed gluten-free crackers as the final coating.
- Nut-Based Coatings:
- Almond meal or ground flaxseeds are excellent alternatives for a gluten-free, crunchy texture.
Pro Tips for Perfect Coating
After coating, refrigerate the nuggets for 10–15 minutes to set the coating, ensuring it doesn’t fall off during cooking.
Double Coating:
For extra crispiness, repeat the egg wash and breadcrumb steps for a thicker crust.
Season Each Layer:
Lightly season the flour, eggs, and breadcrumbs to infuse every layer with flavor.
Chill Before Cooking:
After coating, refrigerate the nuggets for 10–15 minutes to set the coating, ensuring it doesn’t fall off during cooking.
Cooking Methods
Cooking your homemade chicken nuggets with ground chicken is where the magic happens. Each method has its own benefits, whether you’re seeking maximum crispiness, a healthier option, or quick convenience. Let’s explore pan-frying, baking, air frying, and deep-frying.
Pan-Frying for Crispiness

Why Pan-Fry?
Pan-frying strikes a balance between crispy texture and moderate oil usage. It’s perfect for those who want a golden exterior without deep-frying.
- Step-by-Step Process:
- Heat about ¼ inch of oil in a skillet over medium heat. Vegetable, canola, or avocado oil works best.
- Once the oil is hot (test by dropping a breadcrumb—it should sizzle immediately), add the nuggets in a single layer. Avoid overcrowding the pan.
- Cook for 3–4 minutes per side or until the nuggets are golden brown and cooked through.
- Place the cooked nuggets on a paper towel-lined plate to drain excess oil.
- Tips for Success:
- Maintain a consistent oil temperature to prevent sogginess or overcooking.
- Flip the nuggets gently using tongs or a spatula to avoid breaking the coating.
Baking: A Healthier Alternative
Why Bake?
Baking requires no frying oil, making it the healthiest option for crispy chicken nuggets.
- Step-by-Step Process:
- Preheat your oven to 400°F (200°C) and line a baking sheet with parchment paper or lightly grease it.
- Arrange the coated nuggets on the prepared sheet, leaving space between each piece.
- Spray the tops of the nuggets lightly with cooking spray to enhance browning.
- Bake for 20–25 minutes, flipping halfway through for even crispiness.
- Check for doneness: the internal temperature should reach 165°F (74°C).
- Pro Tip:
- For extra crunch, place the nuggets on a wire rack over the baking sheet. This allows air to circulate and prevents soggy bottoms.
For a healthier spin on chicken dishes, check out our healthy chicken and mushroom fettuccine Alfredo.
Air Frying for Convenience and Health
Why Air Fry?
Air frying combines health benefits and convenience, producing crispy nuggets with minimal oil.
- Step-by-Step Process:
- Preheat the air fryer to 375°F (190°C).
- Arrange the nuggets in a single layer in the fryer basket, ensuring they don’t touch. Cook in batches if necessary.
- Lightly spray the nuggets with cooking spray for a golden finish.
- Air fry for 10–12 minutes, flipping halfway through, until they’re crisp and fully cooked.
- Pro Tip:
- Don’t overcrowd the basket. Crowding can lead to uneven cooking and less crispiness.
Deep-Frying for Ultimate Crunch
Why Deep-Fry?
Deep-frying yields restaurant-quality chicken nuggets with the crunchiest exterior.
- Step-by-Step Process:
- Heat 2–3 inches of oil in a deep pot or fryer to 350°F (175°C).
- Carefully lower a few nuggets into the hot oil, ensuring they’re fully submerged.
- Fry for 3–4 minutes or until golden brown and cooked through.
- Remove with a slotted spoon and drain on paper towels.
- Safety Tips:
- Use a thermometer to maintain a steady oil temperature.
- Avoid overcrowding the pot, which can lower the oil temperature and make nuggets greasy.
Comparing Cooking Methods
| Method | Crispiness | Health Factor | Convenience |
|---|---|---|---|
| Pan-Frying | Moderate | Moderate | Easy |
| Baking | Mild | High | Moderate |
| Air Frying | Moderate | High | High |
| Deep-Frying | High | Low | Moderate |
Serving Suggestions
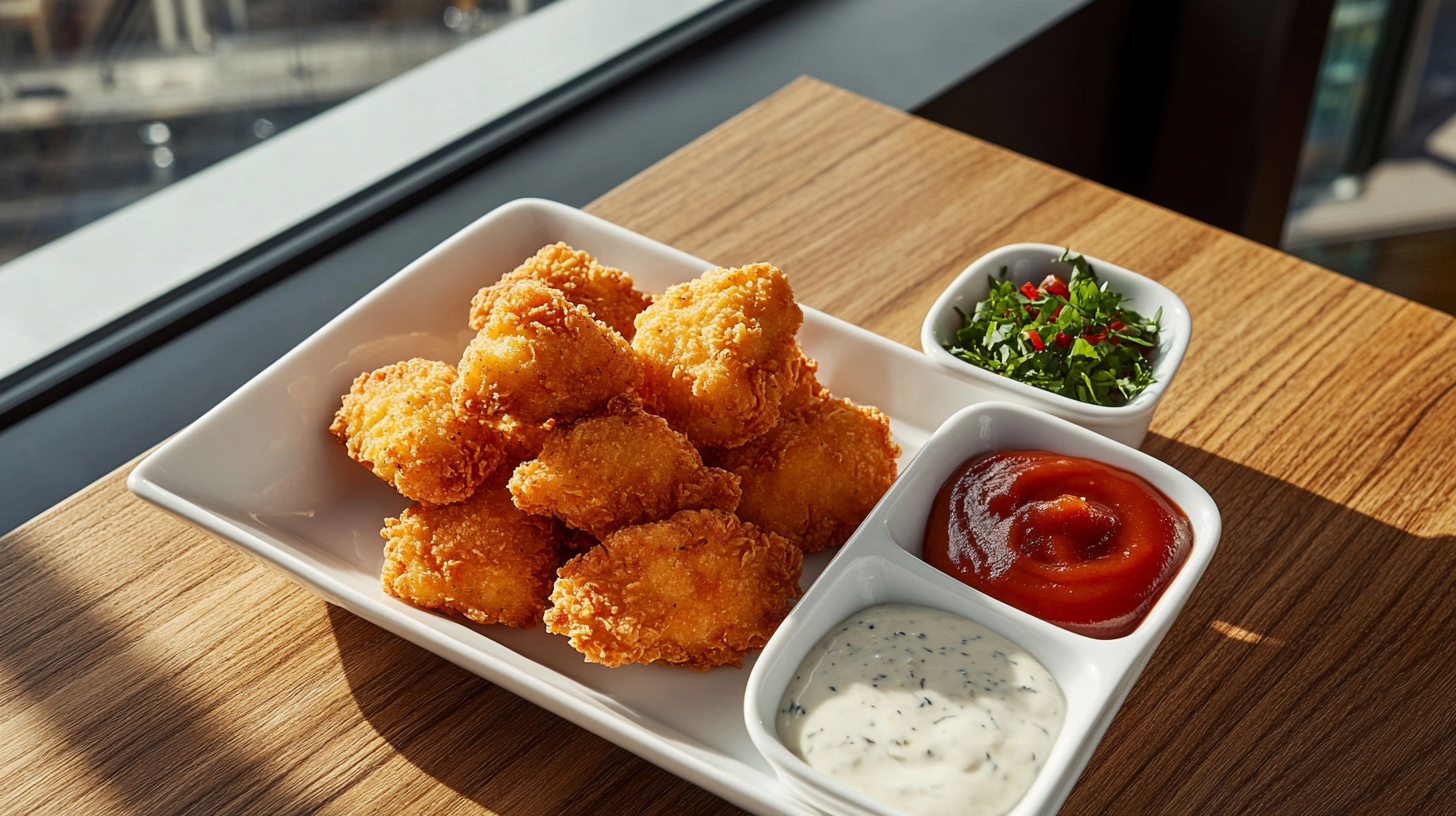
Now that your homemade chicken nuggets are cooked to golden perfection, it’s time to plate them in style. Whether serving as a snack, main dish, or party appetizer, pairing your nuggets with the right sides and dips elevates the meal.
Side Dips and Sauces That Complement Chicken Nuggets
Dipping sauces add flavor and excitement to every bite. Here are some classic and creative options:
- Classic Sauces:
- Ketchup: The all-time favorite, especially for kids.
- Barbecue Sauce: Smoky, tangy, and slightly sweet, it complements the savory nuggets.
- Honey Mustard: A balance of sweetness and tanginess, perfect for nuggets.
- Creamy Dips:
- Ranch Dressing: A creamy, herby dip that pairs well with the crispy coating.
- Garlic Aioli: A rich and garlicky sauce for an upscale twist.
- Blue Cheese Dressing: Ideal for those who love bold flavors.
- Creative Options:
- Sweet Chili Sauce: Adds a spicy-sweet kick for adventurous eaters.
- Avocado Dip: A creamy and healthy alternative.
- Buffalo Sauce: For a spicy twist, toss the nuggets in Buffalo sauce before serving.
Healthy Side Dishes to Pair with Nuggets
Balance your meal with nutritious sides that complement the nuggets:
- Vegetable Options:
- Roasted Veggies: Try sweet potatoes, carrots, or broccoli roasted with olive oil and herbs.
- Side Salad: A fresh mix of greens, cucumbers, and cherry tomatoes with a light vinaigrette.
- Starch Options:
- Baked Fries: A healthier alternative to classic French fries. Sweet potato fries are a great option too.
- Rice or Quinoa: Lightly seasoned grains pair well with the protein-rich nuggets.
- Kid-Friendly Sides:
- Mac and Cheese: Creamy and comforting, it’s a surefire hit with kids.
- Corn on the Cob: A fun and simple side dish.
Storing and Reheating Leftovers
If you’ve made a big batch of chicken nuggets, they’re easy to store and reheat:
Avoid overcrowding when reheating to maintain a crispy exterior.
Storing:
Let the nuggets cool completely before storing.
Place them in an airtight container and refrigerate for up to 3–4 days. For longer storage, freeze them in a single layer before transferring to a freezer bag.
Reheating:
Oven: Reheat at 375°F (190°C) for 8–10 minutes to restore crispiness.
Air Fryer: Heat at 350°F (175°C) for 5–7 minutes for quick reheating.
Microwave: Use short bursts for convenience, though this may soften the coating.
Pro Tip: Avoid overcrowding when reheating to maintain a crispy exterior.
FAQs
Can I Freeze Homemade Chicken Nuggets?
Yes! Homemade chicken nuggets freeze well. After coating the nuggets, arrange them in a single layer on a tray and freeze until solid. Transfer to a freezer bag, removing excess air. They can be cooked directly from frozen, adding a few extra minutes to the cooking time.
How Do I Make Nuggets Juicy and Tender?
To keep nuggets juicy, use a combination of white and dark meat in your ground chicken. Incorporating breadcrumbs and eggs into the mixture also helps retain moisture.
What Are Some Kid-Friendly Nuggets Variations?
Kids love fun shapes! Use cookie cutters to make dinosaur, heart, or star-shaped nuggets. You can also sneak in vegetables like grated zucchini or carrots into the chicken mixture for added nutrition.
How Long Can Homemade Nuggets Be Stored?
Cooked chicken nuggets can be refrigerated for up to 4 days or frozen for up to 3 months. Make sure to store them in an airtight container to prevent drying out.
Are Homemade Nuggets Better Than Store-Bought?
Absolutely! Homemade nuggets let you control ingredients, avoiding unnecessary additives, preservatives, and excess sodium. They’re fresher, tastier, and customizable to your family’s preferences.
Conclusion
Making chicken nuggets from scratch using ground chicken is not only simple but also rewarding. From the flavorful chicken mixture to the crispy coating and versatile cooking methods, every bite of homemade nuggets is a testament to wholesome, delicious cooking. With countless serving ideas and the ability to customize ingredients, these nuggets are sure to become a favorite in your kitchen.